
How to Mass Update Records in Salesforce: 5 Methods Compared
Compare 5 Salesforce mass update methods and choose the right one for your record count.




How to mass update records in Salesforce: 5 methods compared
Salesforce offers several native and third-party methods for mass updating records, ranging from built-in list views to external tools like Data Loader. The right choice depends on your record count, technical comfort level, and whether you need a one-time bulk operation or ongoing pipeline management. This guide covers five methods with step-by-step instructions: list views, Data Import Wizard, Data Loader, Weflow's pipeline view, and Apex/Flow automation.
When should you mass update records in Salesforce?
Bulk updates save hours of manual clicking and reduce data entry errors. Here are the most common scenarios where RevOps and sales operations teams need to update Salesforce records in bulk:
Data cleanup and standardization — Fixing inconsistent picklist values, correcting misspelled company names, or standardizing phone number formats across thousands of records
Record ownership transfers — Reassigning accounts, contacts, or opportunities when reps leave, territories change, or you restructure sales teams
Stage and status updates — Marking stale opportunities as closed-lost, updating lead statuses after a campaign, or advancing deals that meet specific criteria
Post-migration corrections — Cleaning up data quality issues after importing records from another CRM or merging Salesforce orgs
Campaign response updates — Updating campaign member statuses after an event, webinar, or marketing touchpoint
The cost of not having a reliable bulk update process is measured in hours of manual work per week and the inevitable data quality drift that comes with one-record-at-a-time edits.
How to choose the right Salesforce bulk update method
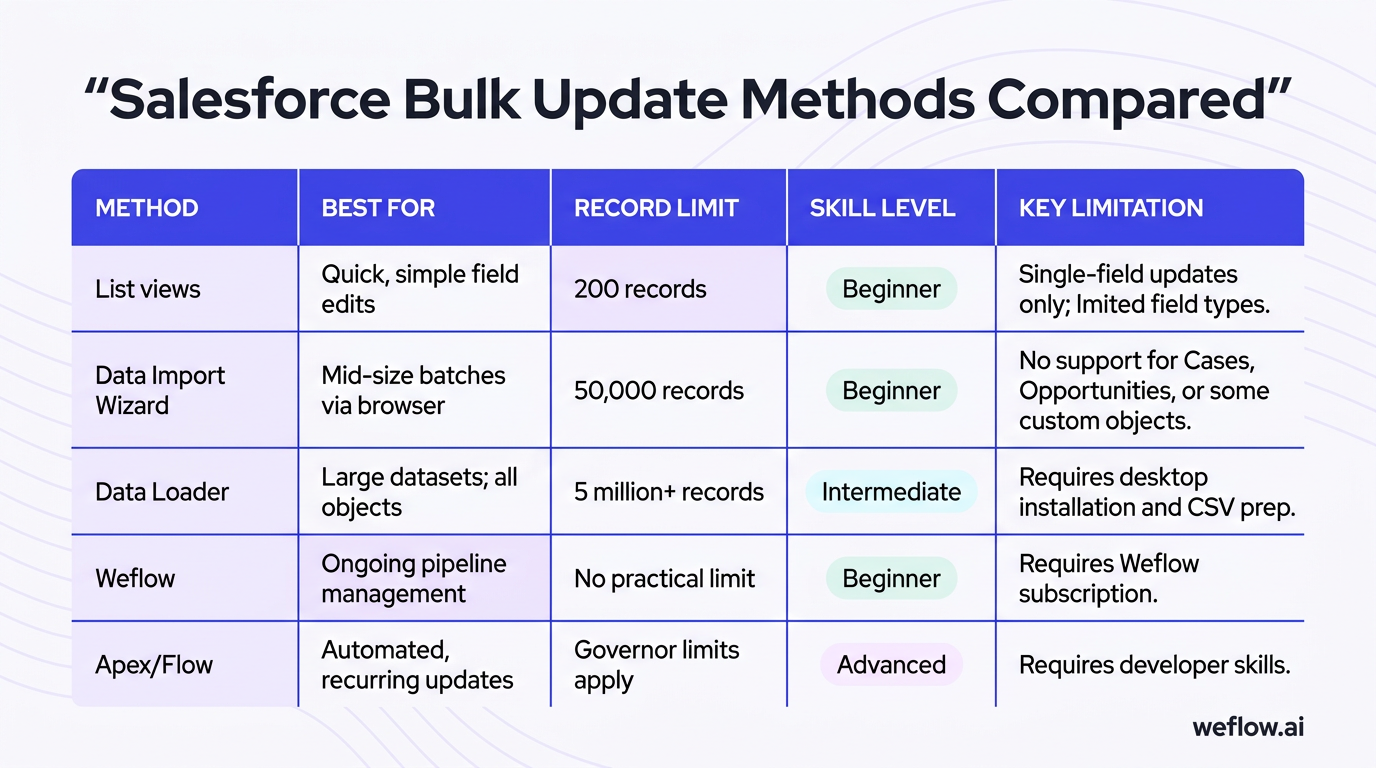
Each method has distinct tradeoffs around record limits, complexity, and object support. This table summarizes when to use each approach:
Method | Best for | Record limit | Skill level | Key limitation |
|---|---|---|---|---|
List views | Quick, simple field edits | 200 records | Beginner | Single-field updates only; limited field types |
Data Import Wizard | Mid-size batches via browser | 50,000 records | Beginner | No support for Cases, Opportunities, or some custom objects |
Data Loader | Large datasets; all objects | 5 million+ records | Intermediate | Requires desktop installation and CSV prep |
Weflow | Ongoing pipeline management | No practical limit | Beginner | Requires Weflow subscription |
Apex/Flow | Automated, recurring updates | Governor limits apply | Advanced | Requires developer skills |
Start with list views for quick edits under 200 records. Move to Data Import Wizard when you need to update more records but want to stay in the browser. Use Data Loader for large-scale operations or objects the wizard doesn't support. Consider Weflow when you need a spreadsheet-like interface for day-to-day pipeline work without the CSV export-import cycle.
How to mass update Salesforce records using list views
List views let you edit up to 200 records directly in Salesforce's Lightning Experience interface. This is the fastest method for quick, single-field updates when you don't want to touch a CSV file.
When to use list views: Small batches (under 200 records) where you're updating one field at a time—changing record owners, updating picklist values, or modifying text fields.
Step-by-step: mass update via list view
Enable inline editing permissions. Go to Setup, search for "User Interface," and confirm that Enable Inline Editing and Enable Enhanced Lists are checked. Users also need Edit permissions on the specific fields they want to modify.
Create or select a list view. Navigate to the object tab (Accounts, Contacts, Opportunities, etc.). Click the gear icon and select New to create a filtered view, or choose an existing view.
Filter to target records. Add filter criteria to narrow down to the records you want to update. For example: Stage equals Prospecting AND Last Activity greater than 90 days ago.
Add the target field as a column. Click the gear icon, select "Select Fields to Display," and add the field you want to edit to your visible columns.
Select records. Check the boxes next to the records you want to update. Use the top checkbox to select all visible records (up to 200).
Inline edit the field. Double-click the field cell on any selected record, enter the new value, and press Enter. Salesforce will prompt you to apply the change to all selected records.
Save changes. Click Save to commit the updates.
Limitations to know:
200-record maximum per operation—you'll need to page through larger datasets
Some field types (formula fields, auto-number, roll-up summaries) can't be edited inline
Lookup fields require exact matches and can be finicky
Works only in Lightning Experience, not Classic
How to bulk update records with Salesforce Data Import Wizard
The Data Import Wizard is a browser-based tool built into Salesforce Setup. It handles up to 50,000 records per import without requiring any software installation. You'll need a CSV file with Record IDs to update existing records.
When to use Data Import Wizard: Mid-size bulk updates (up to 50,000 records) for Accounts, Contacts, Leads, Campaigns, and Solutions. The wizard doesn't support Cases, Opportunities, or many custom objects.
Step-by-step: bulk update via Data Import Wizard
Prepare your CSV file. Export the records you want to update from Salesforce (Reports or Data Loader export). Your CSV must include the Record ID (18-character Salesforce ID) plus any fields you want to update. Keep column headers matching Salesforce API names or labels.
Navigate to Data Import Wizard. Go to Setup, type "Data Import" in the Quick Find box, and select Data Import Wizard.
Select the object and operation. Choose the standard object (Accounts, Contacts, Leads, etc.). Select "Update existing records" as the operation type.
Choose the matching field. For updates, you typically match by Salesforce ID. You can also match by Name or external ID fields for certain objects.
Upload your CSV. Click the CSV upload area and select your file. The wizard shows a preview of your data.
Map columns to Salesforce fields. The wizard auto-maps columns that match Salesforce field labels or API names. Manually map any unmatched columns by clicking "Map" and selecting the target field.
Start the import. Click "Start Import." The wizard processes records in the background and sends an email confirmation when complete.
Review results. Check the import confirmation email for success and error counts. You can also view import history in Setup under Bulk Data Load Jobs.
Limitations to know:
No support for Opportunities—use Data Loader for opportunity updates
No support for Cases or most custom objects
[banner type="download" url="https://www.weflow.ai/resources/cheat-sheets/salesforce-cheat-sheet" text="Salesforce Admin Cheat Sheet" subtitle="Keep the objects, fields, and shortcuts you actually use within reach" button="Get the cheat sheet"]
Can't delete records—update and insert only
50,000 record limit per import job
How to bulk update records with Salesforce Data Loader
Data Loader is Salesforce's desktop application for large-scale data operations. It supports all standard and custom objects, handles up to 5 million records per operation (with Bulk API), and provides detailed error logging. The tradeoff is more setup—you'll need to install the app and prepare CSV files.
When to use Data Loader: Large datasets (50,000+ records), Opportunity updates, custom object updates, or when you need the full error log for troubleshooting validation rule failures.
Step-by-step: bulk update via Data Loader
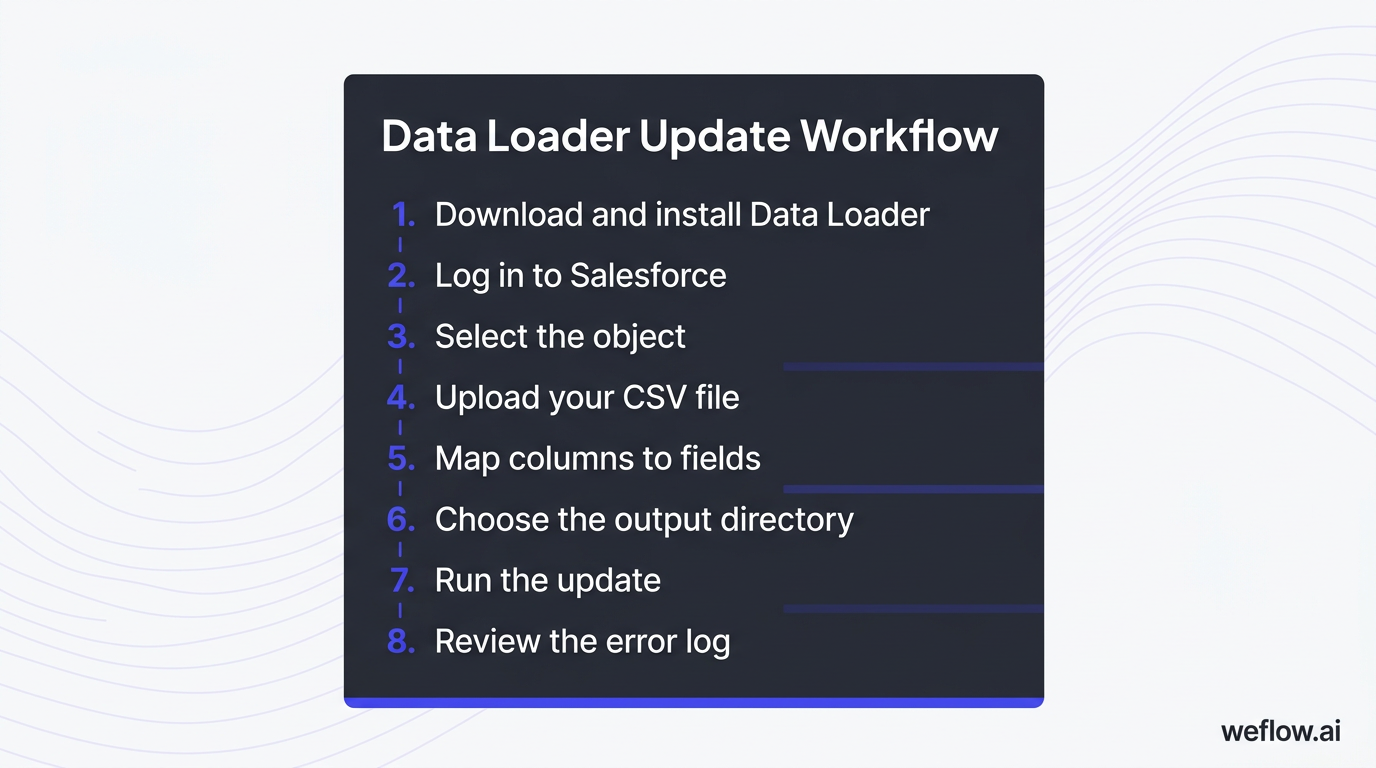
Download and install Data Loader. In Setup, search for "Data Loader" and download the latest version for your operating system (Windows or Mac). Run the installer.
Log in to Salesforce. Open Data Loader and click Update. Enter your Salesforce username and password. If your org restricts IP addresses, append your security token to your password.
Select the object. Choose the object you want to update from the dropdown list. Data Loader shows all standard and custom objects your user has access to.
Upload your CSV file. Click Browse and select your CSV. The file must include the Record ID field plus the fields you want to update.
Map columns to fields. Click "Create or Edit a Map." Auto-Match maps columns that exactly match API names. Manually drag unmapped columns to their target fields. Save the mapping for future use.
Choose the output directory. Select a folder for success and error log files. Data Loader creates two CSVs: one with successfully updated records, one with errors.
Run the update. Click Finish to start the operation. Data Loader shows a progress bar and final count.
Review the error log. Open the error CSV to see which records failed and why. Common causes: validation rule violations, required field missing, record locked by another user, or lookup field value not found.
Tip: Security token for IP-restricted orgs
If your Salesforce org restricts login by IP address and you're connecting from an untrusted IP, you'll need to append your security token to your password. Find your token in Personal Settings under Reset My Security Token. The login format becomes: passwordSECURITYTOKEN with no space between them.
Tip: When to use upsert vs. update
Use Update when you have Salesforce Record IDs and only want to modify existing records. Use Upsert when you have an external ID field and want Data Loader to insert new records if no match exists, or update if a match is found. Upsert is useful for integrations where you're syncing data from an external system.
For very large datasets: Data Loader can use the Bulk API to process millions of records in parallel. In Settings, enable "Use Bulk API" and set your batch size. The Bulk API queues operations server-side and handles them asynchronously—better for overnight jobs or datasets over 100,000 records.
How to mass update Salesforce records with Weflow's pipeline view
Weflow offers a different approach: a spreadsheet-style pipeline view that syncs changes to Salesforce in real time. No CSV files, no Data Loader setup, no export-import cycles. You filter, select, and bulk edit directly in the browser with changes writing back to Salesforce immediately.
When to use Weflow: Day-to-day pipeline management where you need to update opportunity stages, close dates, amounts, or custom fields across multiple deals without leaving a grid view. Also useful for ongoing data hygiene—weekly cleanup of stale records, owner reassignments, or post-meeting field updates.
Step-by-step: mass update via Weflow pipeline view
Create or open a pipeline view. In Weflow, navigate to the Pipeline section. Create a new view or select an existing one. Views can filter by owner, stage, close date range, record type, or custom fields.
Apply filters to target records. Use the filter panel to narrow down to the records you want to update. For example: Stage equals "Negotiation" AND Close Date is this quarter AND Owner equals your team.
Select records. Check the boxes next to the records you want to modify. Use the header checkbox to select all visible records.
Click Bulk Update. A dialog appears with available fields for bulk editing.
Choose fields and enter values. Select the field(s) you want to update and enter the new values. You can update multiple fields in a single operation.
Review and save. Confirm the change summary showing how many records will be affected. Click Save to push updates to Salesforce.
Why this is faster for day-to-day work:
No CSV prep. You're editing records in place, not exporting to a file and reimporting.
Real-time sync. Changes write to Salesforce immediately—no batch jobs or email confirmations to wait for.
Works across objects. Weflow supports Opportunities, Accounts, Contacts, and custom objects in the same interface.
Validation rule feedback. If a change violates a Salesforce validation rule, you see the error inline rather than discovering it in an error log hours later.
For teams that spend significant time each week updating pipeline data, the time savings compound. A RevOps manager doing weekly pipeline hygiene can cut the update process from 30 minutes of CSV work to 5 minutes in Weflow's grid.
How to mass update records using Apex or Salesforce Flow
For fully automated or logic-driven bulk updates, Apex batch jobs and Flow Builder provide developer-level control. These tools are best for recurring processes that should run on a schedule or trigger automatically based on criteria.
When to use Apex or Flow: Automated updates that need to run daily, weekly, or on a trigger—like marking leads as stale after 30 days of inactivity, auto-closing opportunities past their close date, or enforcing data standards across new records.
Simple Apex example: update Lead status based on criteria
Here's a basic Apex batch class that updates all Leads with no activity in the past 60 days:
global class UpdateStaleLeads implements Database.Batchable<SObject> {

    global Database.QueryLocator start(Database.BatchableContext bc) {
        Date cutoffDate = Date.today().addDays(-60);
        return Database.getQueryLocator([
            SELECT Id, Status
            FROM Lead
            WHERE LastActivityDate < :cutoffDate
            AND Status != 'Closed - Not Converted'
        ]);
    }

    global void execute(Database.BatchableContext bc, List<Lead> scope) {
        for(Lead l : scope) {
            l.Status = 'Closed - Not Converted';
        }
        update scope;
    }

    global void finish(Database.BatchableContext bc) {
        // Optional: send email notification
    }
}
To run this batch job manually, execute in Developer Console:
Database.executeBatch(new UpdateStaleLeads(), 200);To schedule it to run weekly, create a schedulable class or use Salesforce's Scheduled Jobs in Setup.
Flow Builder alternative
For admins without Apex skills, Flow Builder offers a visual way to create bulk update logic. Create a Scheduled Flow that:
Runs on a defined schedule (daily, weekly)
Gets records matching your criteria using a Get Records element
Loops through records and updates field values
Updates records using an Update Records element
Scheduled Flows are limited to 250,000 records per 24-hour period. For larger datasets, Apex batch jobs handle governor limits more gracefully.
Developer skill requirement: Apex requires understanding of Salesforce development, governor limits, and deployment processes. Test thoroughly in a sandbox before running batch jobs in production—a poorly written query can lock records or hit CPU timeout limits.
Best practices for mass updating Salesforce records
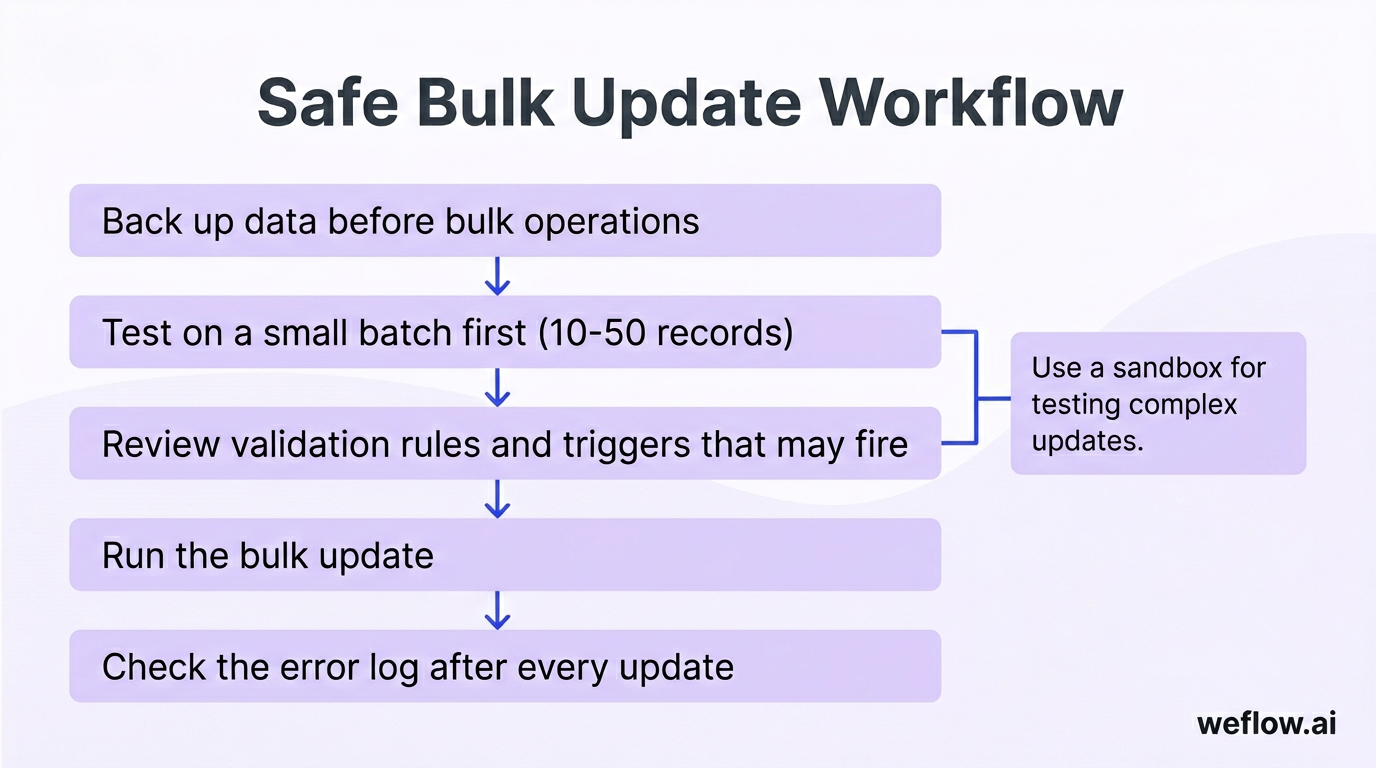
Bulk updates carry risk. A single wrong field mapping can overwrite good data across thousands of records. These practices reduce that risk:
Always back up data before bulk operations. Export the records you're about to update to a CSV. If something goes wrong, you have the original values to restore.
Test on a small batch first (10-50 records). Run your update on a subset and verify the results before scaling to the full dataset. Catch field mapping errors and validation rule issues before they affect thousands of records.
Review validation rules and triggers that may fire. Bulk updates invoke the same automation as single-record edits. A trigger that sends an email on every Lead update will send thousands of emails on a bulk update. Check with your admin before large operations.
Check the error log after every update. Data Loader and import jobs produce error files. Don't assume success—review the error rows to understand which records failed and why.
Use a sandbox for testing complex updates. For operations involving custom objects, complex validation rules, or unfamiliar data, run the update in sandbox first. Refresh your sandbox with recent production data for a realistic test.
Verify record types are consistent when using list views. List views can mix record types. If your inline edit applies to fields with different picklist values by record type, you may get unexpected validation errors.
Which Salesforce mass update method should you use?
The right tool depends on your specific situation:
List views are best for quick, one-off edits under 200 records when you don't want to leave the Salesforce UI. Good for owner reassignments, picklist corrections, and simple field updates.
Data Import Wizard works well for mid-size batches (up to 50,000 records) when you're comfortable with basic CSV preparation and the object you're updating is supported (Accounts, Contacts, Leads, etc.).
Data Loader is the tool of choice for large-scale operations, Opportunity updates, or any scenario where you need detailed error logging. Worth the setup time for updates over 50,000 records or complex data cleanup projects.
Weflow fits teams that need ongoing pipeline management in a spreadsheet-like interface. If your RevOps or sales ops team spends hours each week updating opportunity data manually, the real-time sync and bulk edit features eliminate the export-import cycle entirely.
Apex or Flow makes sense for automated, recurring updates that need to run on a schedule without manual intervention. Marking stale leads, enforcing data standards, or triggering updates based on field changes are good use cases.
For most one-time cleanup projects, Data Loader is the most flexible choice. For day-to-day pipeline hygiene, a tool like Weflow reduces friction by keeping you in one interface. Match the tool to how often you'll do the work and how many records you're updating.
Frequently asked questions
How do I mass update records in Salesforce without Data Loader?
You have several options. For small updates (under 200 records), use list views with inline editing directly in Salesforce. For mid-size updates (up to 50,000 records), use the Data Import Wizard in Setup—no installation required. For ongoing pipeline management, tools like Weflow let you bulk edit records in a spreadsheet-style view that syncs to Salesforce in real time.
How many records can you update at once in a Salesforce list view?
List views support inline editing for up to 200 records per page. You can select all 200 visible records and apply a change to one field. For larger datasets, you'll need to page through results or switch to Data Import Wizard or Data Loader.
What is the difference between Salesforce Data Loader and Data Import Wizard?
Data Import Wizard is browser-based, handles up to 50,000 records, and supports only certain standard objects (Accounts, Contacts, Leads, Campaigns, Solutions). Data Loader is a desktop application that supports all standard and custom objects, handles up to 5 million records via Bulk API, and provides detailed error logging. Use the wizard for simple jobs; use Data Loader for large or complex updates.
Can I mass update Salesforce records from a CSV file?
Yes. Both Data Import Wizard and Data Loader accept CSV files for bulk updates. Your CSV must include the Salesforce Record ID (18-character ID) to identify which records to update. Include only the fields you want to modify—you don't need to export all fields.
How do I mass update opportunity stages in Salesforce?
Data Loader is the standard method for bulk opportunity updates since Data Import Wizard doesn't support Opportunities. Export your opportunities to CSV, add or modify the Stage column, then use Data Loader's Update operation with ID as the matching field. Alternatively, Weflow's pipeline view lets you select multiple opportunities and update stages directly without CSV work.
Is there a way to mass update record owners in Salesforce?
Yes. All bulk update methods support the OwnerId field. For list views, add Owner as a visible column and inline edit. For Data Loader, include the OwnerId column in your CSV with the new owner's User ID (18-character format). Data Import Wizard supports owner updates for objects it handles. When reassigning large account portfolios, Data Loader is typically the fastest approach.
What should I do before running a mass update in Salesforce?
Back up the records you're about to update by exporting them to CSV—this gives you a restore point if something goes wrong. Test your update on 10-50 records first to catch mapping errors. Check with your admin about validation rules, triggers, and workflow rules that will fire on the updated records. Review field-level security to confirm you have edit permissions on the target fields.
Can I undo a mass update in Salesforce?
Salesforce doesn't have a native undo feature for bulk updates. Your primary protection is the backup CSV you exported before the update. To reverse changes, modify your backup file to reflect the original values and re-import using the same ID matching. For critical data, consider using a sandbox to test the full update-and-restore process before running in production.

.webp)